Construction Begins on the HiVi 3BS
Last weekend I took the Fundamentals of Woodworking Class at Woodcraft. I recommend finding a class like this if you have no experience working with power tools (like me). The project we build in class was a book stand. Not exactly sure what I'm going to do with it, but it allowed me to learn how to use the table saw, chop saw, joiner, planer, band saw, drill press, belt and disk sander and an orbital sander.
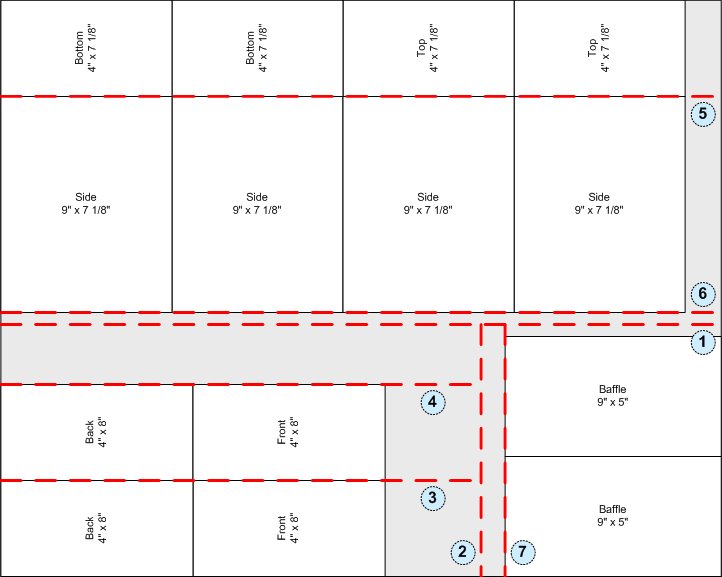
One of the first things I've discovered about making speakers is that the plans do not necessarily tell you how to cut the wood. I used Visio to draw rectangles representing the pieces I would need to build the speaker cabinet. I then placed the rectangles in a bigger rectangle representing a standard piece of Baltic Birch Plywood. It ends up, all I needed to buy was a 24" x 30" piece of plywood.
I brought my material and new skills to Reston Community Center's woodshop. The woodshop manager in Reston is Ken (at least on Tuesday nights). He was extremely helpful. Even though I had just taken a class, I discovered the tools are all slightly different in operation. He helped me get acquainted and gave me some tips on the best way to make my cuts.
In addition to knowing that the cuts will fit on the plywood, you should also think about the order in which you make the cuts so they are consistant as well as allowing you to have control of the material.
- Cut the material roughly down the center at 13 1/2". This just makes the piece easier to handle.
- Cut the smaller piece (11 1/2") into 2 pieces at around 11". This doesn't have to be exact, it just makes it easier.
- Set the fence on the table saw to 4" and cut the first strip for the front and back pieces.
- Leave the fence set to 4" and cut the second strip for the front and back pieces.
- Leave the fence set to 4" and cut the third strip for the top and bottom pieces.
- Adjust the fence to 9" and cut the strip for the sides.
- Leave the fence set to 9" and cut the strip for the baffles.
- Set the fence to 8" and cut the front and back pieces. Note, I have not marked the remaining cuts in the diagram.
- Set the fence to 7 1/8" and cut the top, bottom and side pieces.
- Set the fence to 5" and cut the baffles.
posted by David @ 8:45 AM
1 comments
![]()
